ప్రస్తుతం video editing చేయడానికి మనకు చాలా editing apps మరియు softwareలు అందుబాటులో ఉన్నాయి. Mobileలో editing చేయాలంటే InShot, KineMaster, CapCut లాంటి apps ఉన్నాయి. Laptop లేదా desktopలో చూస్తే CapCut, Adobe Premiere Pro, After Effects, Filmora, DaVinci Resolve లాంటి softwareలు ఉన్నాయి.
నేను కూడా editingలో different softwareలు, plugins మరియు workflows ఉపయోగిస్తూ ఉంటాను. అందుకే ఈ articleలో నేను ఏ software ఎలా ఉపయోగిస్తున్నాను, Premiere Proలో project setup ఎలా చేసుకుంటాను, After Effectsతో ఎలా work చేస్తాను, నేను ఉపయోగించే కొన్ని plugins ఏంటి, అలాగే DaVinci Resolve మరియు CapCut గురించి నా experience ఏంటో explain చేస్తున్నాను.
ఇది complete beginner guide కంటే నా personal editing workflow మరియు experience గురించి ఎక్కువగా ఉంటుంది.
Mobileలో Video Editing చేయడానికి ఏ Apps ఉన్నాయి?
మీరు mobile phoneలో editing చేయాలనుకుంటే ప్రస్తుతం చాలా options ఉన్నాయి.
ఉదాహరణకు:
- KineMaster
- CapCut
- InShot
Basic cuts, transitions, text, effects, reels editing లాంటి పనులకు ఇవి ఉపయోగపడతాయి.
అయితే నేను professional video editing చేయాలనుకున్నప్పుడు laptop/desktopలో professional editing softwareను prefer చేస్తాను.
అందులో నేను ఎక్కువగా Adobe Premiere Pro మరియు After Effects ఉపయోగిస్తాను.
నేను Premiere Pro ఎలా Start చేశాను?
నేను Premiere Proని మొదట ఉపయోగించడం ప్రారంభించినప్పుడు Adobe Creative Cloud ద్వారా softwareని download చేసుకున్నాను.
Adobe Creative Cloud ద్వారా Premiere Pro, After Effects వంటి Adobe applicationsని access చేయవచ్చు. దీనికి ముందుగా మీ అవసరానికి సరిపోయే plan తీసుకోవాలి.
Adobeలో Student, Individual/Professional మరియు Business వంటి different plans/offerings ఉంటాయి. Student planకి eligible అయితే discounted pricing ఉండే అవకాశం ఉంటుంది.


నేను కూడా Creative Cloud subscription తీసుకుని Premiere Proని ఉపయోగించడం ప్రారంభించాను.
నా subscriptionకి నేను నెలకు దాదాపు ₹638–₹640 rangeలో pay చేసిన experience ఉంది.
గమనిక: Adobe subscription prices, plans మరియు eligibility కాలానుగుణంగా మారవచ్చు. కాబట్టి ప్రస్తుతం ఉన్న priceని Adobe official websiteలో check చేయడం మంచిది.
Premiere Pro Interface ఎలా ఉంటుంది?
Premiere Pro మొదట open చేసినప్పుడు interface కొంచెం complicatedగా అనిపించవచ్చు. కానీ once workflow అర్థమైతే editing చాలా structuredగా చేయవచ్చు.

కొత్త project create చేసిన తర్వాత editing కోసం Sequence setup చేయాలి.
Sequence ద్వారా మనం edit చేయబోయే videoకి సంబంధించిన settingsని configure చేసుకోవచ్చు.
ఉదాహరణకు:
- Video resolution
- Frame size
- Frame rate
- Portrait video
- Landscape video
- 1080p
- 2K
- 4K
- ఇతర project-specific settings
అంటే మీరు Instagram Reel కోసం vertical video edit చేస్తున్నారా, YouTube కోసం landscape video edit చేస్తున్నారా అనే దాని ఆధారంగా sequence settings set చేసుకోవచ్చు.
Premiere Proలో Workspaces ఎందుకు Useful?
Premiere Proలో నాకు personally నచ్చిన featuresలో Workspaces ఒకటి.
DaVinci Resolveలో different tasksకి separate pages/workspaces ఉంటాయి. ఉదాహరణకి media import, editing, audio, effects, color grading, export ఇలా different sections ఉంటాయి.
Premiere Proలో మాత్రం Workspaces ద్వారా మన అవసరానికి అనుగుణంగా panelsని arrange చేసుకోవచ్చు.
ఉదాహరణకు మీరు Color workspace select చేస్తే color gradingకి సంబంధించిన panels కనిపిస్తాయి.
అందులో:
- Lumetri Color
- Scopes
- Color adjustment tools
వంటి options access చేయవచ్చు.
అలాగే Editing, Effects, Audio వంటి workflowsకి కూడా relevant panelsని quickly access చేయవచ్చు.

ఇది editing సమయంలో unnecessary panelsతో screen clutter కాకుండా, మీరు చేస్తున్న taskకి అవసరమైన tools మాత్రమే ముందు ఉంచుకోవడానికి ఉపయోగపడుతుంది.
నేను ఉపయోగించే Premiere Pro Plugins
Premiere Proలో basic software toolsతో పాటు నేను కొన్ని external plugins మరియు extensions కూడా ఉపయోగిస్తాను.
నా workflowలో ఉపయోగించే వాటిలో:
Animation Composer
నేను ఉపయోగించే pluginsలో Animation Composer ఒకటి.
దీని ద్వారా animations మరియు motion-related presetsని editingలో ఉపయోగించుకోవచ్చు.
నా usageలో ఇది basic animation workని fasterగా చేయడానికి usefulగా ఉంటుంది.

Film Impact
నేను ఉపయోగించే మరో plugin Film Impact.
దీనిలో transitions మరియు visual effectsకి సంబంధించిన options ఉంటాయి.
Normal editingలో ప్రతి transitionని manually create చేయాల్సిన అవసరం లేకుండా, ready-made effectsని workflowలో ఉపయోగించుకోవచ్చు.

AE Juice Pack
After Effects workflowలో నేను AE Juice Pack కూడా ఉపయోగిస్తాను.
దీనిలో animations, text animations, ready-made visual elements మరియు sound effects వంటి assets అందుబాటులో ఉంటాయి.
VFX లేదా motion graphics work చేస్తున్నప్పుడు ready-made elements ఉండటం వల్ల కొన్ని tasks fasterగా complete చేయవచ్చు.

మీకు అవసరమైన assets ఆధారంగా external packs తీసుకోవచ్చు. అన్ని usersకి ప్రతి pack అవసరం ఉండదు.
Dagger Extension
నేను ఉపయోగించే extensionsలో Dagger కూడా ఉంది.
ఇది editing workflowలో effects లేదా toolsని quickly search/access చేయడానికి ఉపయోగపడే extensionగా నేను ఉపయోగిస్తున్నాను.
After Effectsలో కూడా search-based workflowకి ఇలాంటి tools usefulగా ఉంటాయి.
Premiere Pro మరియు After Effects రెండింటినీ ఎలా Use చేస్తాను?
నా workflowలో Premiere Pro మరియు After Effects రెండింటికీ separate purposes ఉన్నాయి.
Premiere Proలో ప్రధానంగా:
- Video editing
- Cutting
- Timeline work
- Audio
- Basic effects
- Final editing
వంటి పనులు చేస్తాను.
After Effectsలో:
- Motion graphics
- Text animations
- VFX
- Advanced compositions
- Layer-based animation
వంటి పనులు చేస్తాను.
అంటే ప్రతి చిన్న పని కోసం After Effectsకి వెళ్లాల్సిన అవసరం లేదు. Normal editing అయితే Premiere Proలోనే complete చేయడం convenient.
Premiere Pro మరియు After Effects Versions Sameగా ఉండటం ఎందుకు Important?
Premiere Proతో After Effects composition work చేస్తున్నప్పుడు నేను follow చేసే important thingsలో version compatibility కూడా ఒకటి.
ఉదాహరణకు Premiere Pro ఒక versionలో, After Effects పూర్తిగా different versionలో ఉంటే కొన్ని workflowsలో compatibility issues రావచ్చు.
అందుకే నేను రెండింటినీ compatible versionsలో ఉంచడానికి ప్రయత్నిస్తాను.
ఉదాహరణకి:
Premiere Pro 25 + After Effects 25
లేదా
Premiere Pro 26 + After Effects 26
అనే విధంగా same major versionలో ఉంచడం నా workflowలో saferగా ఉంటుంది.


RAM మరియు Performance Settings
Premiere Pro లేదా After Effectsలో editing చేస్తున్నప్పుడు system resources చాలా important.
నా workflowలో Premiere Proకి system RAM మొత్తం allocate చేయకుండా, ఇతర applicationsకి కూడా కొన్ని resources availableగా ఉంచుతాను.
అదే విధంగా After Effectsలో కూడా system resourcesను manage చేసుకోవాలి.
ఇది ముఖ్యంగా heavy 4K projects, effects, animations మరియు multiple layersతో పని చేస్తున్నప్పుడు performanceపై impact చూపించవచ్చు.

Sequence Settingsలో Resolution మరియు Aspect Ratio
మీ projectకి అనుగుణంగా sequence settings choose చేసుకోవడం చాలా important.
Instagram Reels కోసం vertical video అయితే ఒక aspect ratio అవసరం.
YouTube landscape video అయితే మరో format అవసరం.
అదే విధంగా:
- 1080p
- 4K
- Different frame rates
- Portrait
- Landscape
వంటి settings project ప్రారంభంలోనే properly configure చేసుకోవడం మంచిది.

Keyframesను Fasterగా Work చేయడానికి Plugins
Editingలో keyframes చాలా common.
కానీ ప్రతి animationని manually create చేయడం కొంత time-consuming.
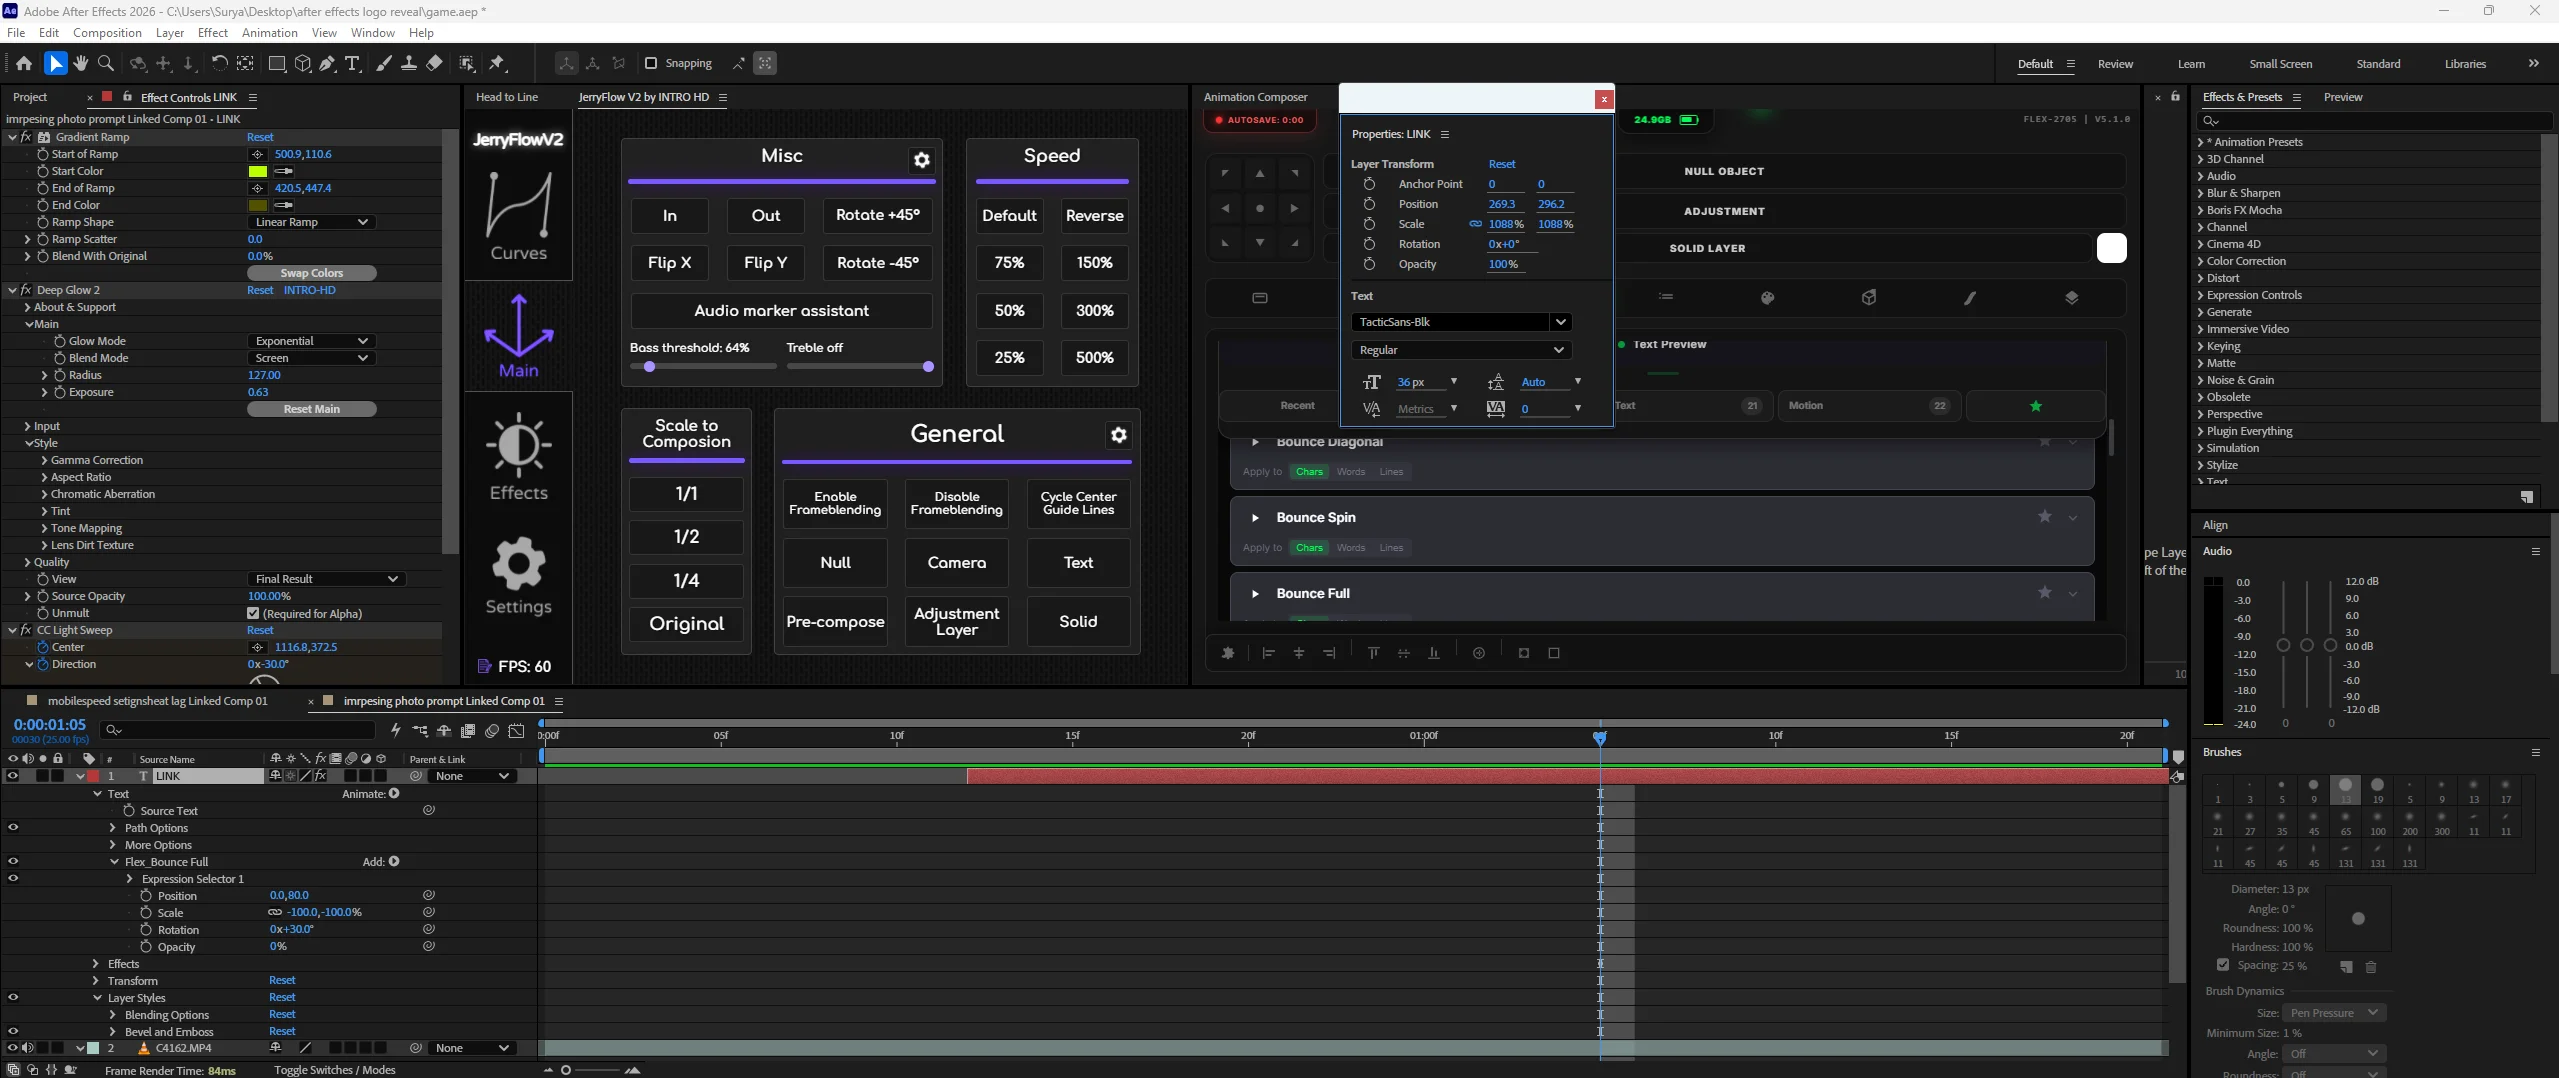
నేను ఉపయోగించే JerryFlow లాంటి ready-made animation tools ద్వారా కొన్ని keyframe-based animationsని fasterగా apply చేసుకోవచ్చు.
మీరు కావాల్సిన layer లేదా elementని select చేసి preset/animationని apply చేసి, తర్వాత మీ అవసరానికి తగ్గట్టుగా customize చేసుకోవచ్చు.
దీనిలో speed, movement మరియు other animation controlsని adjust చేసే options కూడా ఉంటాయి.

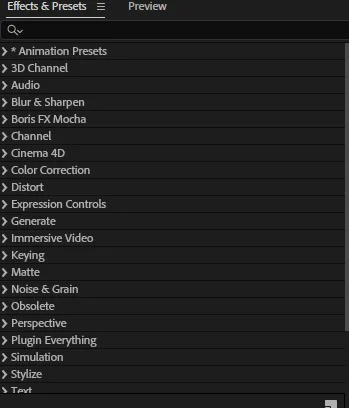
After Effectsలో నేను ఉపయోగించే Effects
After Effectsలో different visual effects మరియు pluginsని ఉపయోగిస్తాను.
నా workflowలో:
- Glow effects
- Light Sweep
- Layer effects
- Animation presets
- Text animations
- Transitions
వంటి effects ఉపయోగిస్తాను.
కొన్ని effects native After Effects tools ద్వారా చేయవచ్చు. అవసరమైనప్పుడు external plugins కూడా ఉపయోగించవచ్చు.
Layerపై right-click చేసినప్పుడు Layer Styles వంటి options కూడా ఉపయోగించుకోవచ్చు.
After Effects Projectని ఎలా Save చేస్తాను?
Editing complete చేసిన తర్వాత projectని properly save చేయడం చాలా important.
After Effectsలో File menu ద్వారా projectని save చేసుకోవచ్చు.
Projectకి సంబంధించిన fileని futureలో మళ్లీ open చేసి editing continue చేయాలంటే project fileని properly store చేసుకోవాలి.
Project filesని organized foldersలో maintain చేయడం కూడా useful.
DaVinci Resolve గురించి నా Experience
DaVinci Resolveని నేను ముఖ్యంగా Color Grading కోసం usefulగా చూస్తాను.
Particular areaకి మాత్రమే color adjustment చేయాలి అనుకుంటే masking tools ఉపయోగించి specific portionకి corrections చేయవచ్చు.
అందువల్ల color grading మీద ఎక్కువ focus ఉన్న workflowsకి DaVinci Resolve చాలా useful option.
[ఇక్కడ DaVinci Resolve Color Grading screenshot add చేయండి]
Premiere Proలో Object/Masking Tools
Premiere Proలో నేను usefulగా భావించే featuresలో masking/object-related tools కూడా ఉన్నాయి.
ఉదాహరణకి videoలో ఒక particular object లేదా areaని select చేసి దానికి సంబంధించిన maskని create చేయవచ్చు.
తర్వాత tracking ఉపయోగించి ఆ selected area videoలో movementకి అనుగుణంగా follow అయ్యేలా చేయవచ్చు.
దానిపై:
- Glow
- Background elements
- Text
- Other visual effects
వంటి things add చేయవచ్చు.
ఇది manually frame-by-frame tracking చేయాల్సిన workని కొన్ని situationsలో simplify చేస్తుంది.
[ఇక్కడ Object Mask / Tracking screenshot add చేయండి]
Finalగా నేను ఏ Editing Software Recommend చేస్తాను?
మీరు beginner అయితే వెంటనే Premiere Pro లేదా After Effects నేర్చుకోవాల్సిన అవసరం లేదు.
Mobile Editing
Simple reels మరియు social media videos కోసం:
CapCut / KineMaster / InShot
లాంటివి సరిపోవచ్చు.
Professional Video Editing
Professional timeline editing, content creation మరియు client projects కోసం:
Premiere Pro
నాకు practical option.
Motion Graphics & VFX
Advanced animations, text animation మరియు VFX కోసం:
After Effects
useful.
Color Grading
Advanced color correction మరియు grading కోసం:
DaVinci Resolve
చాలా useful.
అంటే ఒకే software అన్నింటికీ best అని నేను చెప్పను. మీరు చేస్తున్న work ఆధారంగా software choose చేసుకోవడం better.
నా Editing Workflow
నా workflowని simpleగా చెప్పాలంటే:
Premiere Pro → Main Video Editing
↓
After Effects → Motion Graphics / VFX / Advanced Animations
↓
Plugins → Faster Animations / Transitions / Visual Assets
↓
DaVinci Resolve → అవసరమైనప్పుడు Advanced Color Grading
ఇలా నా అవసరానికి అనుగుణంగా different toolsని combine చేసి ఉపయోగిస్తున్నాను.
Final Thoughts
Video editing నేర్చుకోవడానికి ప్రస్తుతం చాలా options ఉన్నాయి. Mobileలో basic editing నుంచి professional desktop editing వరకు ప్రతి levelకి softwareలు ఉన్నాయి.
నేను కూడా మొదట simple editing tools నుంచి professional software workflowకి వచ్చాను. ఇప్పుడు నా regular editingలో Premiere Pro, After Effects మరియు అవసరమైనప్పుడు different pluginsని ఉపయోగిస్తున్నాను.
మీరు beginner అయితే మొదట softwareని చూసి confuse అవ్వకుండా, మీరు ఎలాంటి videos edit చేయాలనుకుంటున్నారు అనేది decide చేసుకోండి.
Reels మాత్రమే అయితే mobile editing app చాలాసార్లు సరిపోతుంది.
Professional YouTube videos లేదా client projects అయితే Premiere Proలాంటి professional editor useful.
Motion graphics లేదా advanced animations అవసరమైతే After Effects నేర్చుకోవచ్చు.
Color gradingపై ఎక్కువ focus ఉంటే DaVinci Resolveని try చేయవచ్చు.
చివరికి software కంటే మీ editing skills, storytelling, timing, cuts మరియు creativity ఎక్కువ important.
నా ఉపయోగంలో ఉన్న Tools & Plugins
- Adobe Premiere Pro
- Adobe After Effects
- DaVinci Resolve
- CapCut
- Animation Composer
- Film Impact
- AE Juice Pack
- Dagger
- JerryFlow